All posts by AltusHost

How to delete all comments in WordPress?

Forms on the website without more sophisticated measures of bot prevention, such as Google Recaptcha or Cloudflare Turnstile are often targeted to send spam emails, therefore if you have a problem with SPAM comments and thousands of comments on your website, in addition to deleting the comments you should also activate bot-prevention methods on your comment forms.

It is important to note that not all bot-prevention methods are foolproof, and some can even pose a challenge to human users. Captchas, for example, can sometimes be difficult to read, frustrating users and driving them away from your website. Therefore, it is important to strike a balance between security and usability when implementing bot-prevention methods. Nevertheless, taking steps to prevent spam bots from infiltrating your website can save you time, effort, and headaches in the long run, allowing you to focus on creating great content and engaging with your audience.

Deleting comments using a WordPress plugin

The simplest way to delete all comments on a WordPress site is to use a plugin such as Bulk Comment Deleter

After installing the plugin, navigate to the comments screen and click on one of the three buttons to delete unwanted comments:

  • Delete All Unapproved – This option will let you delete all Unapproved (pending) comments.
  • Bulk Delete SPAM – This option will let you batch delete every SPAM comment.
  • Delete ALL – This option will let you delete ALL comments on your WordPress website.

Deleting comments from the MySQL database

WordPress uses the wp_commentmeta and  wp_comments tables in the database to store all comments on the site.

In order to delete all comments on the site, you can access the site’s database from PHPMyAdmin and delete comments from there.

First, from cPanel, click on the PHPMyAdmin icon:

Then, on the left, select the name of the site database for which you want to delete all comments:

Deleting all comments on the site

Click on the SQL link at the top of the page and enter the command in the field:

TRUNCATE `wp_comments`;

TRUNCATE `wp_commentmeta`;

In the command, replace the table prefix wp_ with the prefix you use on the site. You can see the prefix inside the wp-config.php file

and then click the Go button .


Deleting only SPAM comments on the site

If you want to delete only SPAM comments on the site, instead of the above command, use:

DELETE FROM `wp_comments` WHERE `comment_approved` = ‘spam’;


Deleting only unpublished comments on the site

If you want to delete only unpublished comments on the site, use the command:

DELETE FROM `wp_comments` WHERE `comment_approved` LIKE (‘0’);


As we mentioned at the beginning of the text, while SPAM comments can be a nuisance for website owners, they are unfortunately a reality of online publishing. In addition to deleting all comments, it is necessary to also secure the forms. However, by taking proactive measures to secure your website forms and prevent bots from infiltrating them, you can significantly reduce the number of unwanted comments and free up your time to focus on more important aspects of your website. So, if you’re struggling with SPAM comments, don’t wait any longer. Take action today and implement the necessary bot-prevention measures to safeguard your website and ensure a more pleasant user experience for you and your visitors.

ecommtrends

Top Strategies to Boost Your E-commerce Sales in 2023

The number of online card payments in the United States has been on a steady rise over the years. According to recent statistics from the US Department of Commerce, online shopping has seen significant growth, with approximately 360 million online shoppers in the US in 2020. Ignoring this trend means missing out on the chance to achieve great success in business. To stay competitive, it is essential to adopt modern trends and cater to the ever-evolving needs of customers. To develop a growth strategy for your online store in 2023, we have compiled some practical tips that will help you increase sales.

Why is it important to apply trends in online commerce?

Companies that have undergone digital transformation predict twice the growth of those that have not. This is the result of a global survey by the research company Valoir, in which 1,400 companies participated.

Digital transformation should not bypass online commerce, primarily due to the “migration” of customers to the internet. If you are not present on all the channels your potential customers use, just two clicks will take them to a seller who is ready to meet their needs in the modern age.

To avoid this scenario, below are the e-commerce trends for 2023.

E-commerce trends for 2023

Some e-commerce practices have been around for some time and will continue in this year, while there are also a few novelties that should definitely be followed:

  1. Artificial intelligence
  2. Augmented reality
  3. Live shopping
  4. Product search by nearest location
  5. Presence on all channels
  6. Social media as sales channels

Artificial intelligence

Every online store that intends to be successful and long-term in the market should apply solutions based on artificial intelligence (AI).

AI affects the business’s ability to offer a better customer experience, make the offer personalized, and optimize overall operations, from inventory management, through ordering to payment.

Specifically, the benefits of using artificial intelligence are as follows:

  • Improved customer experience

You have probably already encountered chatbots. When you enter the homepage of a website, after a few seconds a space appears where you can type in a question and send it.

This is actually a chatbot whose task is to provide 24-hour customer support to interested clients. Some responses can be automatic, but also more concrete, based on the ability to recognize natural language or script.

Customer support of this kind is very useful because modern customers expect real-time responses. In addition, chatbots are a more cost-effective solution than customer support agents.

In addition to the role of customer support, chatbots can also recommend products and thus move page visitors towards purchasing. For example, if a user enters a question related to winter boots, the chatbot can suggest the best-selling boots from your site and also offer socks as a suggested additional purchase.

  • Personalized offer

Imagine being able to offer each visitor to your site exactly what they are interested in at every moment. With the help of AI, this is becoming a reality.

By analyzing a large amount of data, AI can create personalized product recommendations for each individual user. This is based on their previous purchasing history, product searches, and even their behavior on the website.

In this way, customers are offered exactly what they are looking for, increasing the likelihood of a sale. In addition, this personalization increases the loyalty of customers to the brand, as they feel that their needs and preferences are taken into account.

Augmented reality

When it comes to the application of new technology, it is important for e-commerce businesses to mention the technology called “augmented reality” (AR). If you apply this in your business, you will certainly offer potential customers a unique experience and a chance to stand out from competitors.

In fact, it is the ability for potential customers to try out your product in 3D dimensions before deciding to purchase it. Creative, 3D studios for augmented reality can create 3D models of all your products, place them on your website, and with the help of the appropriate application and code, allow users to use them virtually.

For example, if you want to buy a new armchair, thanks to augmented reality, you will be able to see how its 3D model fits into your living room. This is possible because the 3D model can be placed in the corner of the room you want, and moved until you see if it is appropriate.

Live Streaming Shopping

How can you make product promotion more attractive? With so many online stores offering the same products as you, this is one of the key questions.

According to numerous marketing researches, video content records greater audience engagement. However, in addition to recorded video content, it is even better to occasionally organize live streams.

Namely, in a live broadcast, presenters can demonstrate the use of the product and show all its benefits. On the other hand, potential customers can ask questions, leave reactions, and almost get a shopping experience as if they went to the store.

By introducing “live shopping,” you will increase interaction with the audience, stand out from the competition, and increase revenue.

Product search by the nearest location (Google Local Inventory Ads)

Google Local Inventory Ads is a trend that is yet to gain ground in the years ahead. It is available in about 20 countries worldwide, but its wider application is expected in the future.

It is about the possibility for users to find a specific product in the nearest store by searching for it online. The idea is to shorten the search time for users, by enabling them to search online which store closest to them has the item they have in mind.

Here, therefore, it is not about classic online shopping where the product is ordered online, but about searching for a product online and the Google app showing in which store it is available.

Presence on all channels

We admit that it is challenging to administer all communication channels with customers, but it is the only way to reach as many potential customers as possible.

Let’s take the example of selling clothes for multiple target groups. Each of them has a favorite channel they use, and you need to be active on it.

Website, i.e., online store, Facebook, Instagram, TikTok, email, telephone sales – be present on all of them because you do not know on which one a potential customer will notice you.

Social media as sales channels

Social media were initially used as a channel for promoting and raising brand awareness. However, with their increasing popularity, they have become places where direct shopping takes place. Facebook and Instagram are the most popular platforms for eCommerce in Europe. Both platforms offer features that allow businesses to showcase their products and drive sales directly from their pages, such as shoppable posts and the ability to set up a storefront. Other social media platforms like Pinterest and Twitter also have eCommerce capabilities, but are not as widely used for this purpose in Europe.

This stems from the fact that it is easy for sellers to post products on networks, and for customers to order them quickly and easily. However, to attract customers on Instagram or Facebook, it is necessary to follow the following rules:

  • Create useful and interesting content consistently
  • Collaborate with influencers who will honestly promote your brand
  • Use user-generated content (messages of praise sent to you by customers) as an indicator of your credibility to potential customers
  • Use social media as customer support channels by responding to user queries

By following these tips, you will certainly achieve greater engagement with potential customers and increase revenue. Don’t wait too long to adopt this strategy because ignoring inevitable technological changes can have far-reaching consequences for your business.

The concept of micro-interaction across devices 

You’re probably convinced that you don’t know what the term “microinteraction” means. If you think of computers and other devices, you’re right. However, it is not only the developers who are in contact with them, but also you. Every computer user, phone user or just anyone using a smart device has certainly had the opportunity to see or hear at least one of them.

They significantly improve the user experience and allow you to stand out from the competition. Therefore, the message to all IT professionals and designers is to include them in their software applications.

Here’s what it’s all about.

When you download a document from the Internet, you are usually shown a circle with a number of percentages as a sign of how long you have to wait to have it on your account. Then, if you type a new password for your Gmail account, the system will give you feedback whether it’s weak or strong, or if you’re missing a number to make it valid. When you turn on a computer or phone that was shutdown, you usually hear a short tone. And there are many more examples.

These are all microinteractions.

Microinteractions help differentiate you from the competition

Microinteractions can be defined as events that have two main goals in relation to the user:

Providing information about the current state of the system

  • They improve navigation through the site/application
  • They facilitate interaction with the content of the site
  • They provide information about the completion of an action or show that its execution is in progress
  • They give recommendations to users
  • They encourage sharing, liking and commenting on content
  • They direct the user’s attention

Providing a unique experience while using a device.

Well-designed microinteractions are an indicator of commitment to user experience. They are the icing on the cake, without which, nowadays, it is impossible to stand out from the competition. Often, it is microinteractions that contribute to brand building, because users memory is about the sound and the image.

Despite these important features, some developers and designers do not include microinteractions in their programs, not realizing that this can negatively affect current and future customers. Especially in an era of ever-increasing competition when details make the difference between an ordinary and advanced website or application.

Microinteractions usually consist of several elements:

  1. Triggers – trigger a microinteraction. They can be initiated by the user or the system.
  2. Rules – determine what happens after a microinteraction is triggered.
  3. Feedback – informs the user about the state of the system. It can be text or sound.
  4. Modes of operation – what happens to the microinteraction when conditions change.

Microinteractions – examples

When we pointed out at the beginning of the text that all users of smart devices encounter them every day, that’s exactly what we meant. Now we will prove it through examples.

Swipe

The use of a phone, tablet or similar device is unthinkable without the so-called – swipes. It allows easy and smooth movement through the content, while providing a pleasant feeling for the user. It is an action that we often do without thinking, because it does not require effort, on the contrary – it is fun.

Data entry indicator

Creating an account on an app? Want to subscribe to Netflix? It is mandatory to enter personal data and password. Imagine that you have entered all the data and only after confirmation the system “tells” you that something is missing or not good? To prevent this from happening, there are microinteractions that immediately tell you whether the code is strong enough, whether a capital letter or number is missing, or how many digits need to be entered.

Animations

Anything that moves and has bright colors creates dynamism in the system and provides a better user experience. For example, after you pass a level in a game or complete a task, the system can display an animation congratulating you on your success. Whether it’s a jumping unicorn, clapping hands, or some sound – the microinteraction communicates the message and ensures to evoke an emotion in the user.

Indicators of the current state of the system

As we mentioned, microinteractions show at which stage the implementation of some action taken by the user is. If you add a document (upload) to your inbox on Facebook or to an email, the system shows you how long you should wait until the document is ready to be sent.

Restoring the previous state

How many times has the undo option “saved” you so far? Something clicked by accident? Entered the wrong information? Just go back to the previous state by clicking undo. What does it look like when microinteractions are turned on? For example, if you mistakenly “liked” a picture on Instagram, you can cancel this activity by identically clicking on the “heart”, which will then enlarge and slightly “shake”.

A call to action

Microinteractions encourage the user to take some action. For example, if you want to change a photo on an application, the system will offer you the option to add it from the device’s gallery or to take a new photo. This falls into the realm of mixtointeractions as these options can be displayed with motion or sound.

How to design microinteractions

Microinteractions can be challenging and exciting for designers as they are always looking for a new, creative solution that will delight their users. But in order to avoid mistakes and counter-effects, here is what you should pay attention to:

  • Put yourself in the user’s shoes and when creating a microinteraction, keep in mind where, when and why someone is using your app.
  • Entertain users and evoke emotion – how a user feels when using an app is what brings them back to use it again and again. Whether you will use dynamic music, bright colors or something else – it depends on the emotion you want to evoke.
  • Don’t overdo it – you shouldn’t cross the line of good taste or go overboard trying to animate the user because you’ll annoy them. If it takes a long time for the microinteraction to complete, or if you repeat it several times, be sure to cause a counter-effect.
  • Use human language, not technical language – the goal is for users to understand you. If text messaging is part of your microinteraction, make sure it’s in a language that all users understand.

Tools for designing microinteractions

There are many tools for designing microinteractions. Here we will list which ones are best for specific areas.

If you are familiar with coding:

Mobile: Xcode, Android studio

Mobile or Web: Framer

Web: CSS Animation

If you want to create more detailed interactions:

Adobe CC, Origami Studio and Protopie

If you want to create detailed interactions + animation:

Adobe After Effects

Key notes

  • Microinteractions are different design solutions that include visual and auditory elements through which a smart device or application communicates with the user.
  • Microinteractions communicate with the user by indicating his next action, but also improve his entire experience with the application.
  • Examples of microinteractions are: swiping, data entry indicators, reverting to the previous state, animations, indicators of the current state of the system, calls to action.
  • They also affect the positioning of the brand, because microinteractions can be the icing on the cake that will help differentiate it from the competition.

Marketing, PR and branding – how to differentiate them? 

Marketing umbrella is quite large however all of the pipelines that entail this segment are serving different purposes. 

Have a look at the elements listed, they are likely to provide you with an answer. 

Marketing is a sprint, PR is a marathon. There is also branding which is similar to public relations. Confusing? Stay focused until the end and you will finally understand the difference between these activities. It will also be clear to you what their role is in your business, whether it is necessary to apply all three activities or whether it is enough to hire an expert in one area.

“If I had the last dollar left, I would spend it on PR” Bill Gates once said. Judging by the Forbes list in which he is the fourth richest man in the world, it is unlikely that the founder of Microsoft will reach the broke phase. Either way, this statement illustrates the importance of PR for business. This is best presented by Gates’ current balance sheet – the value of his business is $111.6 billion.

This emphasis on public relations does not mean that they take precedence over the other two. Marketing, PR and branding have a unique role in every business. They are not at war. Rather, they will complement each other, creating greater chances of success.

Let’s get into this topic in more detail. We will look at the relationship between PR and marketing, and then public relations and branding.

PR and marketing – what they have in common

When traditional media was still in its infancy, it used to be difficult to determine whether a piece of content was PR or marketing. Social networks and digital media in general have blurred that dividing line even more. Simply, adapting to the modern age, marketing has become softer, more indirect, which has brought it even closer to public relations.

Try scrolling through the business profiles of some smaller businesses or even corporations. Can you tell what is PR and what is marketing?

The confusion stems from the fact that both activities use similar means. It is mostly pre-designed content, with a clearly defined objective, that is distributed through different media channels. Therefore, the PR and marketing department of a company creates campaigns, promotes them through certain channels and measures the reactions of the public/target groups.

However, reflecting on the similarities, the differences between these activities can be distinguished at the same time.

PR and marketing – how to tell the difference

A few essential differences between public relations and marketing will help you clearly outline them and never again be confused about which activity is involved.

  1. The target group

Although it may not seem like it, marketing and PR have different target groups.

Consumer Target Marketing. A clearly defined ideal customer (buyer persona) and its activities are focused on the needs, problems, desires and interests of people who would buy a product or service.

PR addresses the general public – the media, the community in which the company operates, authorities and decision makers, customers and all interested parties in the business in which it implements the PR strategy.

Different target groups come from different goals.

2.Objectives

Marketing activities are aimed at selling products or services and increasing income. All their activities are subordinated to the customer. Therefore, marketing is aimed at the very base of the sales funnel – the consideration phase and the purchase phase in the buyer’s journey.

The goal of public relations is to create a positive attitude of the public towards the company. PR experts create campaigns whose purpose is to build a relationship of trust, loyalty towards the company and to evoke pleasant emotions towards their company.

Does PR affect sales of products or services? Yes, indirectly. It is much easier to sell something if the company is well known to the public and has a positive attitude towards it.

3. Areas of operation

Marketing is completely market oriented. This is best demonstrated by the famous four P’s: product, placement, price and promotion (product, placement, price, promotion). Marketers conduct research and must use data as a guide for the implementation of the goal.

Public relations are focused on creating events, stories (storytelling), campaigns that will attract the attention of the media and other actors interested in the industry in which the company operates.

4. Time frame

You remember the sentence from the beginning of the text. It’s time to explain it too.

Marketing has shorter-term goals than PR. It often sets deadlines for selling a certain number of products. Such precise measurements and monitoring of customer behavior were not possible with traditional media, but are very much practiced in digital.

PR is a long-term activity. The effects of public relations are not “immediate and now”, but are built continuously, patiently and carefully for years. It takes a lot of time and several creative campaigns for the public to notice a new company/product and gradually build a relationship with it.

5. Measurements

Like all activities, PR and marketing require valorization of their activities.

Marketers take the number of leads, customers, products sold and revenue as parameters of their success/failure. They operate with numbers and those are their only parameters.

Public relations observe how many times they were mentioned in traditional or digital media, whether it was in a negative or positive context, whether they achieved cooperation with actors important for the industry in which they operate, how many events they organized, how many conferences they secured participation in and similarly.

So what is PR and what is marketing?

This text would not be complete without definitions. We deliberately left them out at the beginning, because they would hardly make sense. Only when you understand the differences between one term and the other, will you understand the following definitions.

PR or public relations is a strategic communication process aimed at creating a positive image of the public towards the company. The activities of the PR department are focused on cooperation with the media, the community and influential individuals in the industry in which the company operates.

As far as marketing is concerned, we will single out the definition of traditional marketing by the famous expert Philip Kotler (Philip Kotler):

Marketing is the science and art of researching, creating and delivering value to meet the needs of a target market at a profit. Marketing identifies unmet needs and wants. It defines, measures and quantifies the size of the target group and the potential profit.

Do you need both marketing and PR for a successful business?

In short – it would be ideal if you could hire both PR and marketing experts. As we explained, these activities have different goals and deal with different aspects of business.

In which segments do you need PR and in which marketing? These activities generally take place in parallel, but at certain stages one should be strengthened in relation to the other.

If the company is newly founded, in its beginnings, you will hardly be able to sell millions of products immediately. At this stage, PR should be included so that the public knows about your company and gets basic information about the business and products. Practically speaking, it is the first stage of the sales funnel in which an awareness campaign (awareness of the brand) should be implemented.

PR should also play its role in crisis situations where the company is going through negative publicity. Then the PR expert is expected to mitigate it and defend the reputation of the company he works for.

Marketing becomes dominant in situations when a new product is launched, if the deadline for selling the product is shorter, when it comes to an action or a period when a drop in demand is observed. Then marketing activities are usually more aggressive.

Branding

Nike, Apple, Coca-Cola. What associations do you have with these brands? Do they evoke certain emotions for you?

Typically, brand definitions refer to the creation of a logo and the overall visual identity of a company. A brand is much more than that.

Experienced brand managers say that the “gut feeling” you have about a product/company is actually the brand. It is, therefore, an emotion that arises as a result of the mentioned visual identity of the company and the messages it sends to the target group.

The goal of branding is to distinguish one company or its product from another company within the same industry. For example, we all know that there are many restaurants, but they differ on many levels. And it’s not just about food or drink. How the waiters are dressed, how they greet you, how they serve something and in what dish – all of this creates a feeling in consumers who associate with that restaurant, which in the long term contributes to the creation of the brand.

What are the structural elements of a brand?

Brand identity – visual elements such as logo, colors, typography.

Brand voice – way of communication and creation of messages; whether the messages to the audience are serious, humorous, sarcastic.

Brand promise – mission, vision and values of the company.

Brand positioning – how to stand out from the competition.

Brand identity and brand voice require consistency in implementation in order to establish and maintain the brand. This means that frequent and drastic changes to the visual identity of the company and the way of communicating with the public are not desirable.

Branding VS PR

Branding is similar to PR activities, while with marketing there are not so many points of contact. That’s why we’ll explain below how to differentiate branding from public relations.

Namely, branding and PR overlap to the extent that both activities influence the creation of an image in the public, awareness of the company and its products. However, there are two significant differences.

The goal

The goal of branding is to build the identity of the product and to make it stand out from the competition. That’s why there are many products on the market with the same function, which, thanks to a different identity/brand, stand out and find their way to customers.

Time of application

If we were to put marketing, PR and branding on a timeline, activities related to brand positioning should come first. Namely, before any promotional activities, a guide for creating a brand (branding style guide) should be created, in which the visual elements of the brand (brand identity) and the way of addressing the public (brand voice) are defined. Only with a clearly defined visual identity and method of communication, it is possible to implement campaigns. In this way, inconsistency and confusion in creating messages is avoided.

Key notes

Although marketing and PR are seen as synonymous activities, the truth is that they differ in terms of goals, target group, time required for implementation and parameters for measuring results.

In line with these differences, companies need both PR and marketing managers.

Branding and PR overlap in the sense that they influence the creation of a reputation in the public, but they differ in the objectives of their activities and the period of implementation.

How to debug your WordPress site?


You are having a WordPress website and the headline seems oddly familiar? Sudden pop out of error has occurred definitely to anyone having a website at least once. 

It can be very frustrating, especially if you’re not quite sure what the problem is. However, there is a solution for everything!

WordPress has a lot of built-in features that can help you detect and fix problems. Functions are being activated by editing them to the wp-config.php file.

Continue reading if you are interested in learning the easiest way to diagnose problems with your WordPress site.

1. Enable debug mode

By default Debug mode is disabled in WordPress, so you need to enable it by editing the wp-config.php file and changing the value from define( ‘WP_DEBUG’, false ); to define( ‘WP_DEBUG’, true );

define( 'WP_DEBUG', true );
chrome 1SVVMwZc4d - How to properly DEBUG in WordPress ✔️

Enabling WP_DEBUG will start displaying error messages directly on the page where they occur.


2. Display error messages

Enabling WP_DEBUG will start displaying error messages directly on the page where they occur, to disable this, and only record errors in a log file, add the following to wp-config.php

define( 'WP_DEBUG_DISPLAY', false );
chrome CYlAtmI0NB - How to properly DEBUG in WordPress ✔️

3. Enable error log

To enable the error log add the following to the wp-config.php file:

define( 'WP_DEBUG_LOG', true );
chrome Hleo7jrtmz - How to properly DEBUG in WordPress ✔️

Enabling WP_DEBUG_LOG will create a new file debug.log and write all error messages to that file. You can also set a custom file using: 

define( ‘WP_DEBUG_LOG’, ‘/tmp/site-errors.log‘ );

4. Disable Fatal error handler

Since WP 5.2, when a fatal error occurs you only see the message:

image 8 - How to properly DEBUG in WordPress ✔️

This is done for security purposes so that for example, visitors don’t accidentally find out sensitive information:

To see the entire error message directly on the page when it occurs, you can disable the fatal error handler by adding the following in your wp-config.php file:

define( 'WP_DISABLE_FATAL_ERROR_HANDLER', true );
chrome ZaNlSWG2v4 - How to properly DEBUG in WordPress ✔️

5. Display database queries

The SAVEQUERIES wp-config constant saves database queries to an array and We can use that array to display queries. The information saves each query, what function called it, and how long that query took to execute.

To enable query login you can add the following to wp-config.php

define( 'SAVEQUERIES', true );

This will save all database queries on a given page to a global variable $wpdb->queries

To display these queries on every page you can add the following code inside the theme’s footer.php file:

<?php
if ( current_user_can( 'administrator' ) ) {
 global $wpdb;
 echo "<pre>";
 print_r( $wpdb->queries );
 echo "</pre>";
}
?>

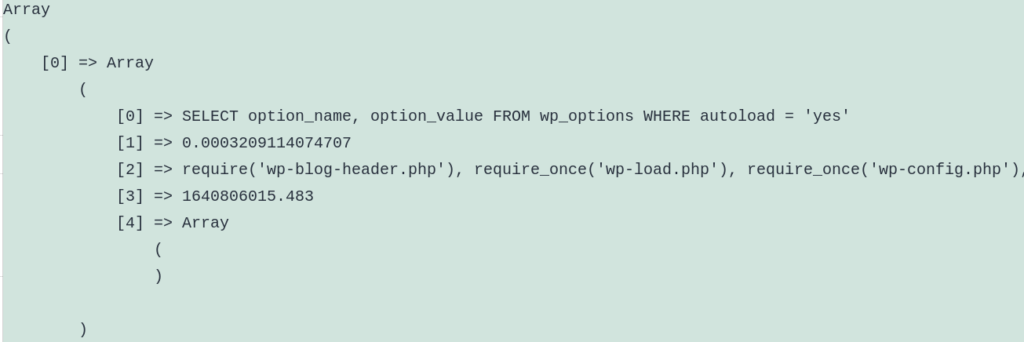
After you’ve done everything, at the bottom of every page of the website you can see queries 

Keep in mind that this will further affect the performance and speed of your WordPress site, so be sure to turn off the above features after the work is completed.

If you think this material is valuable to WordPress comunnity, share it with your friends! Let’s spread the know-how!

And let us know in the comments below what other WordPress themes you want us to cover. 

LinkedIn

A Step-By-Step Guide for Beginners: How to use LinkedIn for Business Goals

If you haven’t created a LinkedIn profile yet, you’ve missed the chance to make new partnerships with people who are important to your business, target new customers, and present yourself as an expert in your field of business. But nothing is lost yet. In this text, we are showing you a detailed guide on how to take advantage of this social network.

LinkedIn is the largest “business” network with almost 800 million users worldwide. Like Facebook and Instagram, it is used to connect people virtually, but in this case, for business purposes. In particular, LinkedIn is an ideal network for promoting a company and its products/services, creating connections with potential clients, partners, and other interested parties, and it is also used for recruiting job candidates.

If you are missing something like this to “give a boost” to your business, continue reading to see why LinkedIn is a channel that modern businesses cannot do without.

LinkedIn Profile and LinkedIn Page – Where to Start

Just as there are personal profiles and company pages on Facebook, the situation is the same on LinkedIn. Therefore, the first thing you should do is create your profile (LinkedIn Profile), and then use it as an administrator for your company’s page (LinkedIn Page).

How?

Once you’ve created a profile, find the Work icon in the top right corner. Clicking on it will open a window where you should find Create a company page. Then you will choose one of the four-page types: Small business, Medium to large business, Educational institution, and Showcase page.

All options are clear to you, except the last one. A showcase page is a page that actually acts as a subpage of the main page (LinkedIn page). It is used to highlight some aspect of a business, product, or service that requires a unique space for promotion and management. Once you’ve created it, it will appear on the right sidebar of your main page in a section called Affiliated pages.

The next step is to upload a profile and cover photo and add a description about your company, similar to the “About Us” page of your website.

Here are some tips:

▪ Profile picture – your company logo

▪ Cover photo – you can place a product, a message that symbolizes your company’s values ​​, or something else that depicts your company

▪ Description – In the about section, which is almost equal to the “About Us” page from your website, write clearly what you do, what your products are, what your values ​​are, and how you can help your target group. Make sure that the description is optimized for search engines and the LinkedIn algorithm itself. This means that you should use keywords, stating the industry you operate in and the products/services you have as this will make it easier for customers to find you

That’s it. You’ve created a company LinkedIn page, which brings us to the next step.

Tell the world you exist by promoting it. You can use these ideas:

▪ Share the page on your personal LinkedIn profile. Below the cover photo, you have the option to Edit the page and Share the page

▪ Place the LinkedIn page icon on the website. Along with shortcuts to Facebook and Instagram profiles, add LinkedIn to the website footer.

▪ Ask employees to add on their profiles that they work for your company, linking to the page.

▪ Send invitations to other network users to follow your page.

How to use LinkedIn for business

LinkedIn generates leads 227% more efficiently than Facebook and Twitter. This is the result of research done by the Hubspot company, whose sample was as many as 5,000 companies.

We have already mentioned some of the advantages of LinkedIn for business, now we will highlight them and explain them in detail.

▪ Connecting with people important to your business;

▪ Positioning the company as a leader in the industry in which it operates;

▪ Leads and customers generating;

▪ Recruitment of job candidates.

Networking

LinkedIn

If you have been trying for a long time to connect with people who would be interested in investing in your business, with colleagues from the university who would give you support, and with new opportunities to expand your business – try LinkedIn. Success is certain.

Firstly start with sending out requests for connections (what friends or followers are on Facebook and Instagram, on LinkedIn are first-, second-, and third-order connections). It would be good if you did it strategically. This means that you should send requests to those people who you assume would be interested in your services, those who could help you, or with whom you could enter into business cooperation. In this way, you create a meaningful network of contacts that are valuable in any business.

Of course, this doesn’t mean you can’t connect with your favorite basketball coach or high school friend. The point is to primarily pay attention to those contacts who could be a good match for you.

Another way to expand your network is to share other people’s content and comment on their posts. So don’t be passive. Compliment someone’s post, agree or disagree, and even join the discussion. These are all ways to show people in your niche that you are there and have something to offer.

Stand out as an expert

LinkedIn is a network where you can showcase your skills and convince potential clients that you are professional and knowledgeable in your industry. By gaining trust, you open the door to new business opportunities.

How do you show that you know your business?

Create posts to showcase your knowledge and experience. It is very important not to fall into the trap of self-promotion and advertising because it turns people off. The point is for the content to be useful to the community you want to connect with – educational, interesting, and humorous.

Of course, in addition to creating educational content, a certain percentage of your posts should unambiguously introduce your products so that potential customers become familiar with them. But it is important to be original, interesting, humorous, and not aggressive in the promotion.

Here’s what you should pay attention to:

▪ Make posts of different lengths. Sometimes a short quote, and sometimes a longer article in which you will show your expertise. Linkedin, of all networks, is the only one that allows writing articles.

▪ Give examples from your experience with previous clients. Feel free to write about personal struggles, failures, successes… People like to know what’s going on in other people’s backyards. Posts like this get more attention. Of course, you should not cross the line of good taste. Smart and humorous.

▪ Ask your connections what they think. This will encourage discussion and your page will grow.

▪ Use photos, videos, and infographics whenever you can.

When it comes to publishing content, it is important that you do it continuously. Create a calendar of posts where you can prepare everything and even schedule posts to be published automatically at the time you define.

We advise you to join LinkedIn groups whose topic is related to your work. They work on the same principle as Facebook groups – people advise each other, share useful material, discuss, and argue. This is your chance to chime in, give some advice, and if you feel it’s appropriate, link to your website or LinkedIn page.

Generating Leads and Customers

All of the above (creating relevant content, connecting with people from your industry, commenting on other posts and discussions in LinkedIn groups) will increase the visibility of your business to the population that needs your services/products. In this way, clients will contact you spontaneously and naturally.

In addition to organic traffic, LinkedIn offers numerous options for paid promotions.

Recruitment of Job Candidates

If you have just started a company and do not yet have the funds to open an HR department, LinkedIn can be a great substitute.

Here’s what you can use:

▪ Job advertisements

▪ Sending direct inbox messages to candidates whose occupation and education match what you are looking for

▪ LinkedIn’s premium package enables an advanced search for candidates with exactly the qualifications you need

Of course, apart from this, it is also possible to search candidates by selecting the name of the position you need in the search bar.

Keynotes

▪ LinkedIn is a business network that is an indispensable station for every modern business.

▪ It is used for networking with other business people and companies, creating an image of a leader in the field of business, generating leads and customers, and recruiting job candidates.

▪ It is necessary to create a LinkedIn profile and LinkedIn page for the company and regularly post mainly educational and interesting content, with a smaller percentage of promotional posts.

python

How to Deploy Python App on Web Hosting?

Python is a high-level, general-purpose programming language. The possibility of hosting Python applications on AltusHost is available from BIZ 50 package.

In order to create a Python application using the graphical interface of cPanel, you can use the following method:

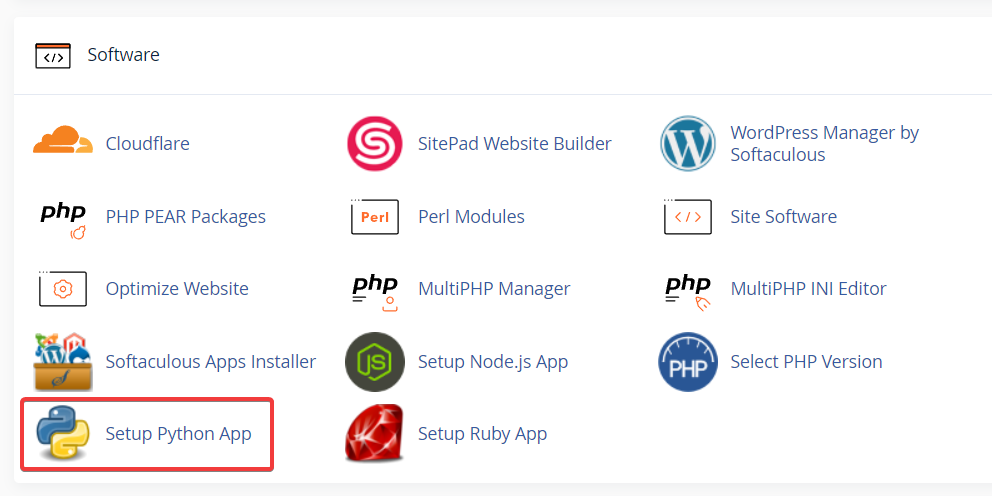
After logging into your cPanel under the SOFTWARE menu you will see the Setup Python App field.

python

Then you need to create an application by clicking the CREATE APPLICATION button.
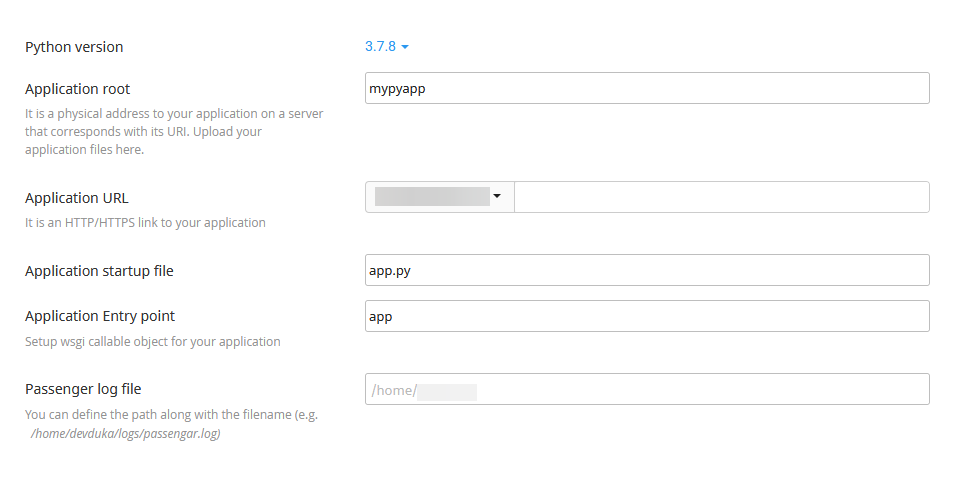
A form will open as shown in the image below.

python

Python version – select the desired version from the drop-down menu.
Application root – refers to the path in the file system of your account.
Application URL – select the domain for which you want to create an application as well as the URL path of your application.
Application startup file – represents the file from which your application is started.
Application Entry point – you can optionally set objects that can be called for your application.
Passenger log file – you can define the path and name of your log file.
Environment variables – you can add variables to + ADD VARIABLE.

After filling out the form, click the CREATE button to create the application.

By clicking on OPEN, you will get the following view:

It works! 
Python v3.7.8 

Hello World Flask – Example

Stop the application by clicking STOP APP.

Then you need to go to File Manager from your cPanel.

Afterward, a file system will open where you need to select and enter the folder you indicated in the application creation form.

When you enter the desired folder, you need to edit the file from which your application is launched, in our example it is app.py. Right-click and select the Edit option, then it is necessary to remove the existing content and insert the new code shown below:

from flask import Flask

app = Flask(__name__)

@app.route('/')
def hello_world():
return 'Hello World'

if __name__ == '__main__':
app.run()

Save the changes by clicking Save Changes, after which the file can be closed by clicking Close.

Since this application uses the flask library you will need to install it for your python application. First, create the requirements.txt file by clicking on “+ File” in the upper left corner, after which a form will open where you need to enter the name of the new file, ie “requirements.txt” and then click the Create New File button.

The content of this file can be edited by right-clicking and using the Edit option, enter the following content:

flask

It is necessary to save the changes by clicking on Save Changes, after which the file can be closed and the process of creating the requirements.txt file is completed.

Also, you need to modify .htaccess in the folder of your Application URL, i.e. if it is e.g. in the public_html folder public_html/.htaccess should be modified. In our example it looks like this:

PassengerAppRoot "/home/username/mypyapp"
PassengerBaseURI "/"
PassengerPython "/home/username/virtualenv/mypyapp/3.7/bin/python3.7"
PassengerAppLogFile "/home/username/passenger.log"

Of course, instead of “username”, you type your username, that is, you modify paths adapted to your needs.

When you return from your cPanel to the Setup Python App again, you will be able to execute the start, edit and delete commands from the graphical interface.

To install packages from the requirements.txt file, click on the edit option.

python

Go to Configuration files under it you will see the option +Add where you need to enter requirements.txt and click on the +Add button. Then click the Run Pip Install button and select requirements.txt.

Now you can start your application by clicking the START APP button.

This completes the process of setting up a Python application on cPanel.

By clicking on OPEN or by entering the URL of your application, you will receive:

Hello World

Finally, near the top you will see the options:

DESTROY – if you want to remove the application.

SAVE – if you want to save the changes.

Watch the video now: Your Step-by-Step Guide

landing page

Everything You Need to Know About a Landing Page for Your Business

Are you sure that you have done everything to increase the sales of your products? You have nice pictures and lots of likes on Facebook and Instagram. You also created a website where you stated who you are and what you do (about page). And that’s all right. However, in order to encourage more people to buy from you, you are missing one more page from your website – the landing page. In this text, we reveal how you can create it and how it can increase your chances of achieving the success you are aiming for.

You might not know it’s called that, but it’s a page you come across every day while doing your research on the internet. It opens when you click on an ad on social networks or a banner on a website. Then you are usually shown product images, some slogans, and a contact form where you need to enter your information.

You probably understand what we are talking about, but we will define it below.

From Leads to Customers – What is a Landing Page

Let’s say, for example, you are selling juicers. How many other online and offline stores have the same product? A lot. Someone who is determined to buy it (hot lead) will probably be your customer if they come across your website and you come across as trustworthy. But what about the rest of the vast majority who have second thoughts or are not interested in your juicers? They need to be pushed toward a purchase using a landing page.

A landing page is a page on your website whose purpose is to convert visitors into leads and customers.

Why is it necessary?

Apart from the home page and the about page, another one is needed where the content and design will be exclusively focused on products and sales. Thus, the attention of visitors and potential customers is strategically directed to the ultimate goal.

The purpose of the landing page is to increase the conversion rate, that is, to convert as many website visitors as possible into customers.

You don’t believe it?

The international marketing agency Unbounce conducted research on 1,000 landing pages and concluded that each of them increases the conversion rate by at least 10%.

When it comes to the structure of the landing page, you should know that in addition to images of products (services) and text about them, it must also contain a form for entering the name and email addresses of visitors. By collecting the data of potentially interested customers (leads), you get the opportunity to stay in touch with them and run a further campaign (nurture campaign) until you lead them to purchase.

What Marketing Goals Does the Landing Page Meet?

From the above, it can be concluded that the landing page performs several important marketing roles:

1. Raises brand awareness – The landing page participates in the brand awareness campaign, allowing your business to present itself to the public and potentially stand out from the competition.

2. Strategically directs visitors to purchase – With its structure, clearly defined messages, and photo/video material, it directs and encourages site visitors to purchase.

3. Enables the creation of a base of potential customers – If someone does not decide to buy now, it does not mean that they will not in the future. The contact form on the landing page allows collects the email addresses of visitors. Thus, you have the possibility to continue the campaign – by sending informative and persuasive emails with the aim of encouraging leads to buy the product.

4. Enables monitoring of visitor behavior – The landing page allows you to collect a number of other data about the behavior of visitors and potential customers:

▪ Number of visits to the page

▪ Where visitors come from (social networks, email, some portal…)

▪ Number of users who filled out the contact form

▪ Bounce rate.

In accordance with this data, it is possible to change the structure and appearance of the landing page, as well as parts of/or the entire marketing campaign.

If you still don’t understand what this is all about, keep reading because below we explain the structure of a landing page.

Structure of Landing Pages that Increase Sales

What should your landing page look like to bring you more customers? Let us tell you right away that every letter, photo and/or video, as well as their layout – has its own purpose. They are chosen and deployed strategically because that is the only way they produce results. This also means that you will probably have to create several versions of the landing page to get to the optimal one, but we will talk about that later.

Landing pages usually consist of the following elements:

▪ Title

▪ Photography/Video

▪ Text (copy), features, and benefits of the product

▪ Call-to-action (CTA)

▪ Contact form

▪ Clients’ experiences (testimonials)

We will present each part in detail so that you know how to create your landing page or give more detailed instructions to an agency to do it for you.

Headline – Grab Attention and Evoke Emotion

A few words in the title determine whether the visitor will stay or leave immediately (bounce). That being said, you need to spend a lot of time creating your headline. Be prepared for several versions until you get the one that best conveys your idea.

What should be put in the title? Advantages.

The most valuable benefit your product/service provides to your target group. It’s the result someone will get if they buy your product. Let’s show an example.

Take the aforementioned juicer. What are its benefits for the customer? List the features/characteristics of that product and turn them into benefits. For example, 3,000 blades per minute. But what does this mean for the user? It could mean something like “It will make you a healthy and delicious juice in 15 seconds”.

Therefore, the title must contain some value for the customer that would evoke emotions. Emotion encourages action, i.e. purchase, and you have already done half the work.

Why is the title so important? When a user visits your landing page, the title is the first thing they will notice. And as harsh as it may sound, you only have a few seconds to grab his attention and keep him on the page.

Photos – Product in Action

The photo should show your product/service in context ie. “in the act”. This means you should show the product in use or the result – what the product will do. This is important because the visual elements also aim to evoke emotion and desire for the product.

Of course, it is also possible to use video, especially if the product is more complex and you need to show some action or process.

Text (Copy) – Informative, but Not Boring

Short, interesting, compelling, informative, persuasive, and confidence-inspiring. The landing page text should be all that. Too much? Hire an experienced and talented copywriter.

What should the text contain? What to write about?

Copy or marketing text should cover several elements:

▪ Problems faced by the target group

▪ Problem-solving (your product/service)

▪ Product characteristics

▪ Product benefits for users

Call-To-Action

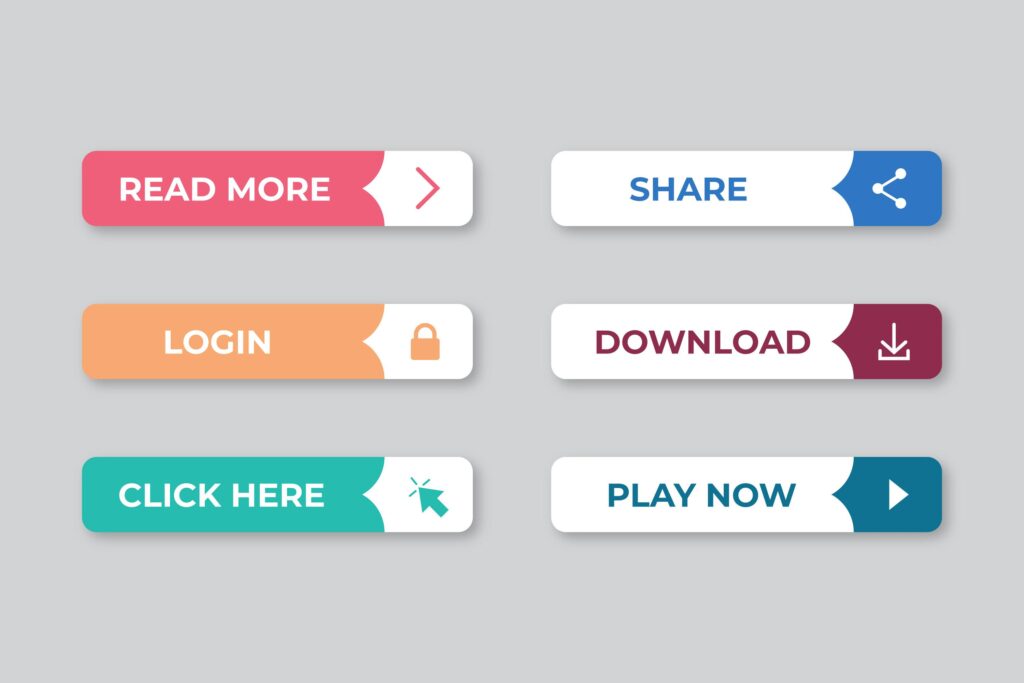
CTA is the “button” that says “buy”, “subscribe”, and “sign up”… So, Call-to-action directly and clearly tells visitors what they should do. It is usually an imperative verb that is meant to encourage action.

Landing Page
Source: freepik.com

The design of this button is very important. You need to decide on a specific button shape and color, making sure that it stands out from the rest of the content. Most often, striking colors are used, and an empty, white space around.

User Experiences – How to Convince a Potential Customer

Trust. It is one of the most important values ​​that encourage a purchase.

Visitors to your landing page should make sure that your product does what you say it does in the text. For that, you need proof (social proof) – customers who have used your product. You should ask them to share their experience, highlighting how you solved a problem for them and improved their life.

It would be good if you could ensure the authenticity of customers who have already used your product, reducing the doubt about the truth of their claims. One way is to record videos of three users of your products because video content will instill more trust than written content.

How to Arrange the Structural Elements of the Landing Page?

We have already said that for the success of the landing page it is also important where its structural parts are located. How important, is also shown by the fact that marketing experts take into account whether the call-to-action will be below the text, on the left or right, or in the upper or lower corner. It is also taken into account how people scan pages, what they look at first, and which angles they don’t even see.

Most often, landing page elements are divided into two parts – the first part that is visible immediately after the page is loaded and the second part that can only be reached by scrolling down. Between them is the intersection (the fold), so the elements are said to be above or below it.

In the first part, you should arrange, in order:

▪ Title

▪ Photo/video (the space to the right of the title)

▪ CTAs

▪ Social proof

The second part of the landing page should contain:

▪ Features and benefits of the product

▪ Same or different CTA

▪ Testimonials

Of course, there are also deviations from this schedule. It is possible to create one schedule, test it and make changes if better results are expected.

A/B Testing – How to Get the Optimal Landing Page?

If you thought that just creating a landing page, means you are done, you were wrong. The next step is to check if it brings you the expected results.

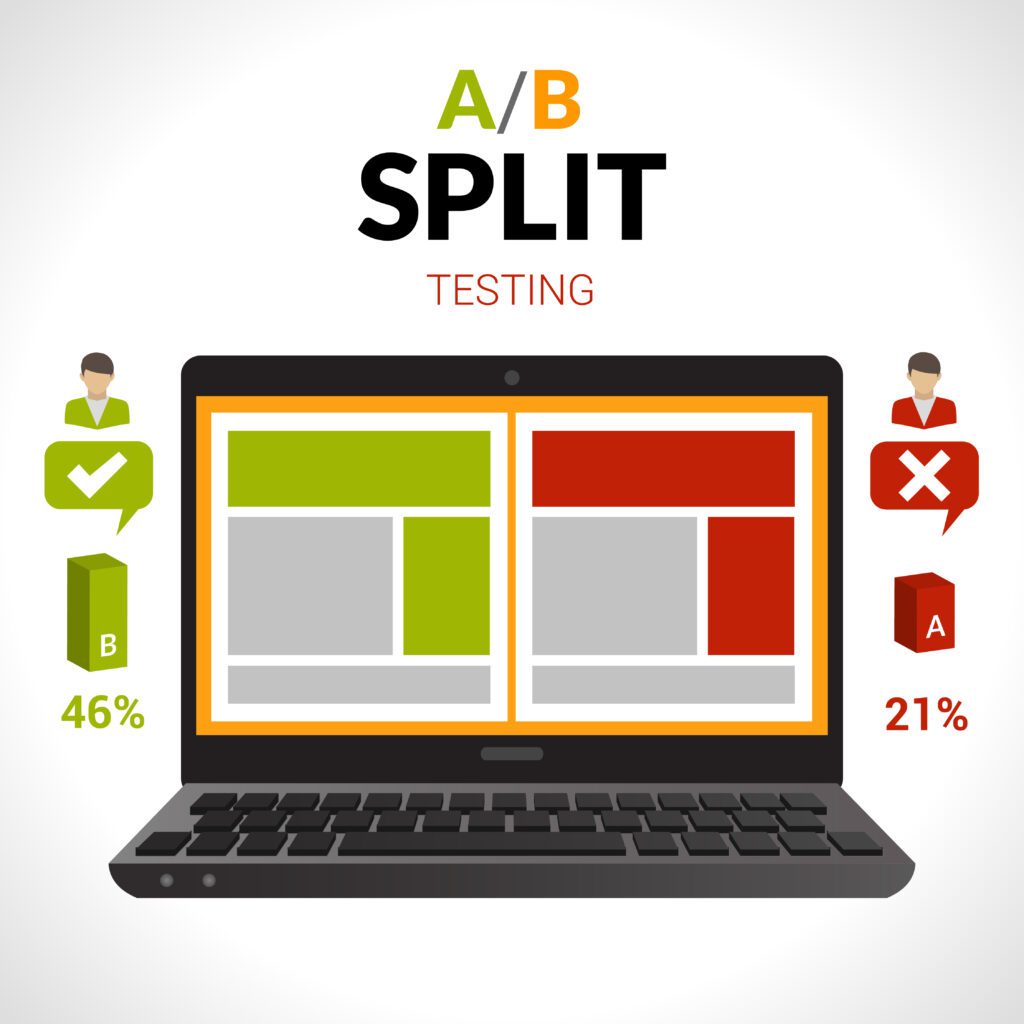
And that’s the moment when we call for help a marketing practice called “A/B testing”. Here’s what that means in practice.

After you have created a landing page and seen that it does not bring you the intended goal, you need to change it, but partially.

landing page
Source: freepik.com

What does it look like?

It is necessary to change one of the structural elements of the landing page and monitor again how this change affects the results. For example, change the headline without changing other elements and track how it affects potential customers. If you are not satisfied, change the text in the call-to-action button or its design. How are things going now?

And so on. You change one element at a time until you reach the version that brings in the most sales.

We hope you find this article helpful! If you did make sure you share it with your friends and colleagues!

How to Set up REDIS in cPanel

Redis is a service that stores data that is called from the memory, and it is recommended to be used if your website often has peaks in visits because it reduces queries to the MySQL service. The latest version of Redis is available on our web hosting platform and is very easy to integrate.

Continue reading to find out how you can easily set it up.

You can create a Redis instance by logging into cPanel.

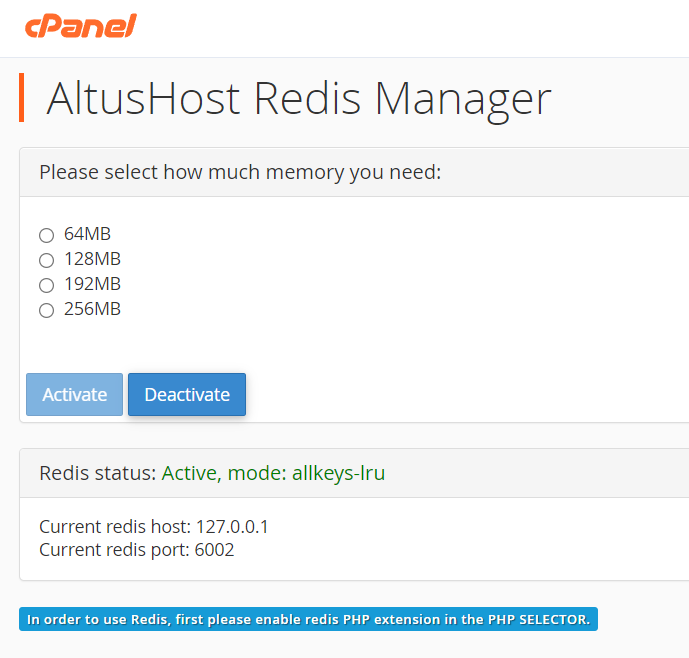
– Find the Redis Manager icon

– Choose how much RAM you want (up to 256 MB) to use for the Redis instance and click Activate.

– Below you will see which port is assigned to your Redis server. Once registered, the port always remains the same. Redis host is always 127.0.0.1 or localhost.

Redis

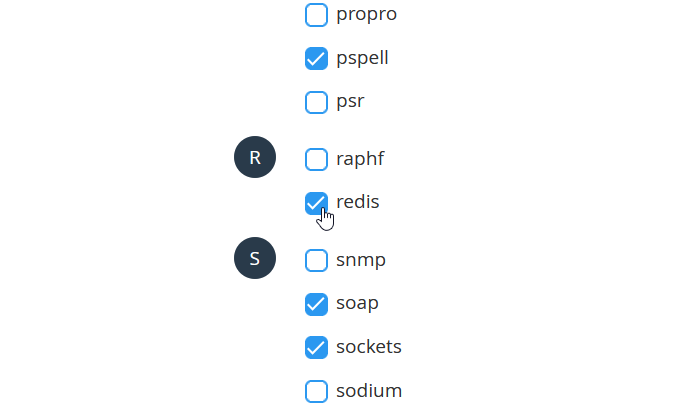
In order for the Redis instance or the server you just created to communicate with the system, it is necessary to activate the PHP extension. So first enter cPanel, then select the PHP version and check Redis.

cPanel

Now PHP and Redis are communicating. Depending on what type of website you have, you can continue with further integration. If you are using Joomla or OpenCart, enter the Redis configuration in configuration.php (Joomla) or admin/config.php (Open Cart). You can find more details here.

How to Integrate Redis into WordPress

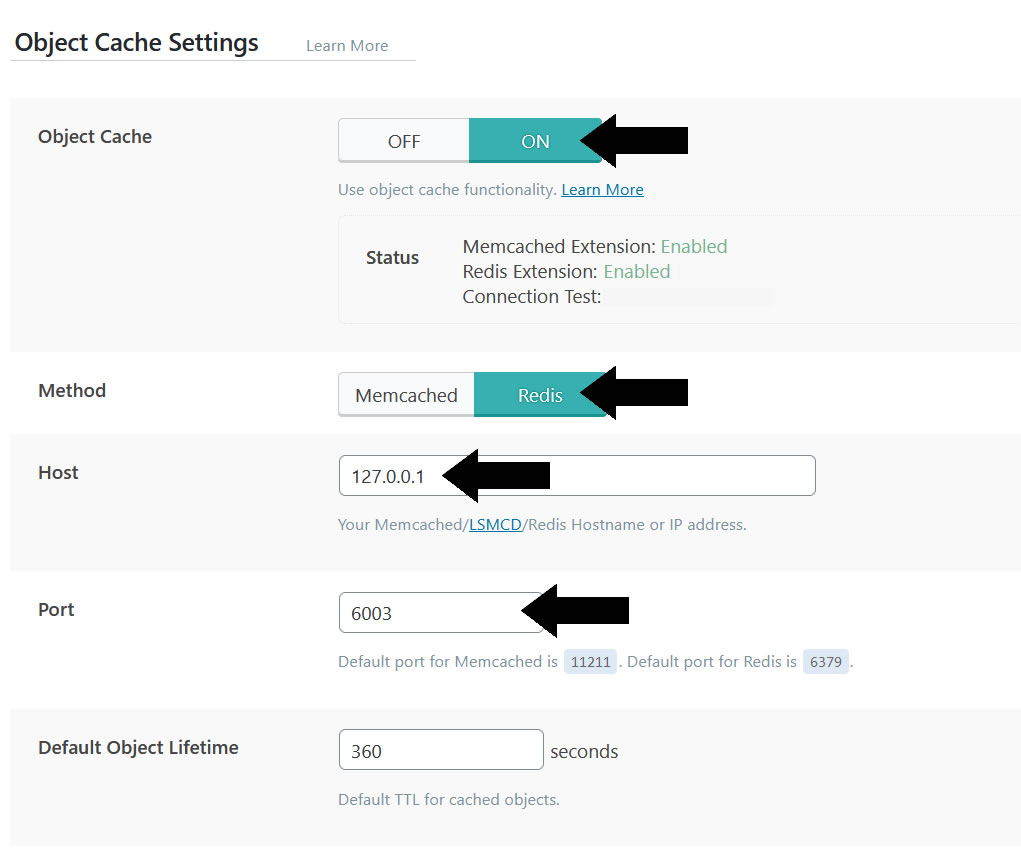
If you have a WordPress website, install the LiteSpeed ​​cache plugin and go to Object Cache Settings. Click ON for Object Cache, Method Redis, Host 127.0.0.1 and the port is the one you see in cPanel > Redis Manager (it only changes if rebooted ie deactivated, and reactivated).

Redis

You can also enable Persistent Connection and Cache Wp-Admin. Click Save Changes and that’s it. Now you have improved the performance of your website, it will consume fewer resources and be more stable and faster under higher traffic flow, in most cases.

However, we believe that it is still necessary to test the functioning of your website with Redis caching because not all websites behave in the same way.

That was easy! If you liked the article share it with your friends and colleagues, and let’s spread the knowledge.

Watch the video now: Your Step-by-Step Guide

NodeJS

How to Deploy a NodeJS Application on Hosting?

NodeJS is an open-source cross-platform JavaScript framework for server-side JavaScript execution.

You can host Node.js applications on AltusHost hosting from BIZ 50 package and above.

In order to create a Node.js application using the graphical interface of cPanel, you can use the following method:

1. After accessing your cPanel, enter the File Manager – a file system will open, there you can create a folder for your application by clicking the + Folder button in the upper left corner. Next, a form will open where you need to enter the name of the new folder and then click the Create New Folder button. In our example, we named the folder app.

2. Open the folder and you can transfer your application by clicking on upload or start developing a new application. In our case, we created an app.js file with the following content:

const http = require('http')
const hostname = '127.0.0.1';
const port = 3000;

const server = http.createServer((req, res) => {
res.statusCode = 200;
res.setHeader('Content-Type', 'text/plain');
res.end('NodeJS Example app - Powered by ALTUSHOST.COM \n');
});

server.listen(port, hostname, () => {
console.log(`Server running at http://${hostname}:${port}/`);
});

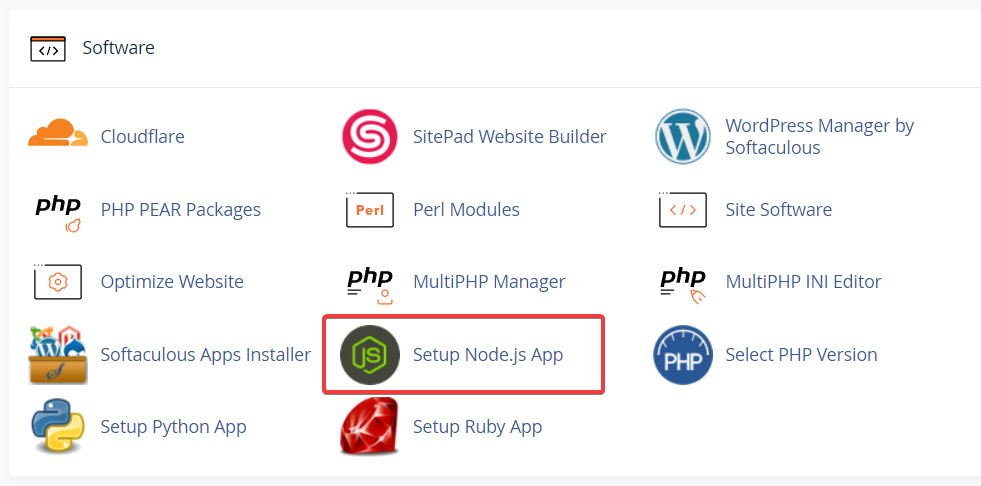
3. After that under the SOFTWARE menu click on the Setup Node.js App field.

NodeJS

Then you need to create an application by clicking the CREATE APPLICATION button.

NodeJS

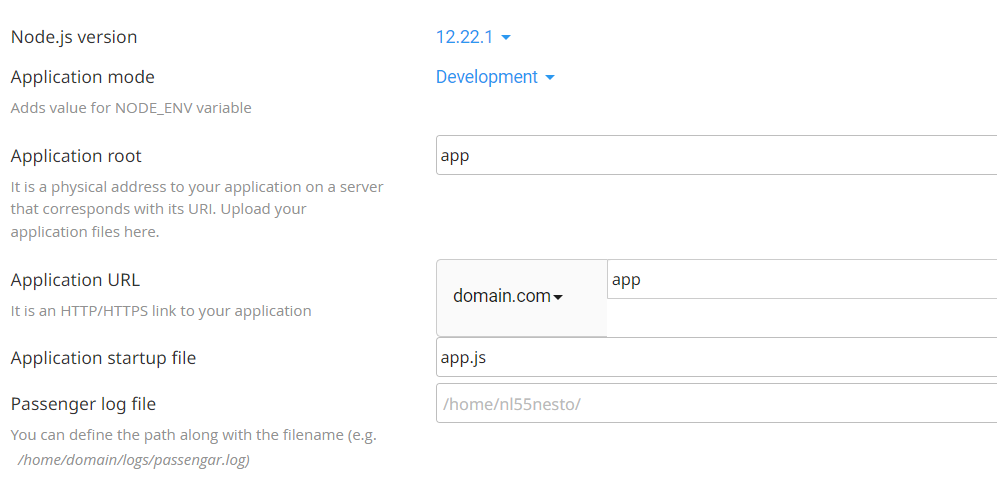
4. A form will open as shown in the picture below.

NodeJS

Let’s explain the fields you need to fill out:

▪ Node.js version – select the desired version from the drop-down menu.

▪ Application mode – you can choose between the Development or Production environment. Initially, you can choose development and later switch to production.

▪ Application root – refers to the path in the file system of your account.

▪ Application URL – here you select the domain for which you want to create the application, as well as the URL path of your application.

▪ Application startup file – represents the file from which your application is started.

▪ Passenger log file – you can define the path and name of your log file.

▪ Environment variables – you can add variables by clicking on + ADD VARIABLE.

5. After filling out the form, click the CREATE button to create the application.

If you followed our example by selecting OPEN, you will get the following:

NodeJS Example app - Powered by ALTUSHOST.COM

Optionally, in order to create the package.json file, you need to go to the File Manager from your cPanel, of course, you can also edit files via FTP.

A file system will open, and you need to select and enter the folder that you indicated in the application creation form.

When you enter the desired folder, firstly click on + File in the upper left corner, this will open a form where you need to enter the name of the new file and then click the Create New File button.

The content of this file can then be edited by right-clicking and selecting the Edit option.

It is necessary to save the changes by clicking on Save Changes, after which the file can be closed by clicking Close – this completes the process of creating the package.json file.

Test example ALTUSHOST package.json:

{
"name": "app",
"version": "1.0.0",
"description": "NodeJS Example app - Powered by ALTUSHOST.COM",
"main": "app.js",
"scripts": {
"test": "echo \"Error: no test specified\" && exit 1"
},
"author": "",
"license": "ISC"
}

When you return from your cPanel to the Setup Node.js App you will have the option to select the following commands: stop, restart, edit and remove. To install packages from the package.json file, click on the edit option.

cPanel

After that, you need to click the Run NPM Install button.

cPanel

From here you have the option to run the commands listed in the package.json file by clicking Run JS script.

6. Finally near the top you will see options:

DESTROY – if you want to remove the application.

SAVE – if you want to save the changes.

In order to execute the saved changes, restart the application, and thus the process of installing the Node.js application on cPanel is completed.

We hope this helped! If you found the article useful share it with your friends and colleagues, and leave us a comment if you have any additional questions.

Watch the video now: Your Step-by-Step Guide